MiaDeRoca Alpine Lifestyle Magazine | Aus diesen Ländern? 
 Klicken Sie hier für die deutschsprachige Version des Magazins.
MiaDeRoca Alpine Lifestyle Magazine | Aus diesen Ländern? 
 Klicken Sie hier für die deutschsprachige Version des Magazins.


I start to get into Christmas mood when I start to do things: bake Christmas cookies, starting to decorate Christmas decoration and especially creating homemade Christmas cards. I turn on my preferred Christmas music, boil a cup of apple-cinnamon tea and sing along. But to be honest, I am no grinch can get into Christmas mood when pre-selecting Christmas items in January.
Personally I have the best time crafting when in company with kids. I am very flexible: relatives, friends, unknown or my own children.When crafting homemade Christmas cards two things are important to me: no perfectionism and having flexible ways of doing things so that all no matter how versatile or talented can have fun doing. Our Christmas card decoration is festive and reduced in white and an additional colour for the winterly, festive touch – the shape of a Christmas theme in wool. But we will tell you one after the other.
By the way: this decoration idea works perfectly well for making greetings cards as well as name tags at home- so you can match dinner invitations with your table decoration.
For those who prefer more colourful self made greeting cards: have a look at the pattern we chose for Easter cards for children.
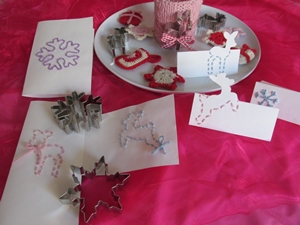
Cookie cutters of your choice. We chose the bambi and derr cutter and ice crystal and snow flake cutter
wool in the desired colours
embroidery needle with sharp point and an eye wide enough for wool – yet the eye should not be too wide, as you have to get through paper, we used number 20
White, thick paper, like white construction paper or card stock
pencil
scissors
As you like it: the print out of our pattern for greeting cards and place cards (see below)
Print out the pattern of our greeting cards and use the size you like. If you like all of the greeting cards and the place cards, print out the template several times. Put the template on your white paper, retrace it and cut out your Christmas cards.
Fold your Christmas cards. Use the left flap on the inside of the card – this is the backside of the front flap. Trace the outside of the cutter. Punch holes with your needle every 2-3mm (0.08-0.11 inches).
Use a simple running stitch.
With some motives, like the symmetrical snow flake in lilac the running stitch leaves the shape still very cryptic. Here we did another round of running stitch filling all the gaps. Looks like a back stitch, but is much easier to make, even for those who have never stitched before.
When doing the place cards there is a clever variety in design: figures with cut-out.
Those who think of using the box cutter, can do so. We chose a version that is as easy to do so it is often used when crafting in kindergarten. Using the needle you punch holes along the line you want to cut out. It is useful to have some fabric, cushion or woollen blanket under your card when punching the holes.
Before folding the place card you stencil the figure and you mark the later folding edge. Above the edge you line out the figure by making hole after hole, below the fold you make needle holes where you can stitch afterwards. As you have done the pencil drawing on the front side you have to erase them before stitching. When you are done whit punching the holes you can fold the place card.
You can of course use the cookie cutters no only to make matching invitation cards and place cards you can use them along the meal as well:
start with appetizers like our finger food with cut out bread and cheese crackers,
go on with a Christmas-themed soup and cut out mozzarella cheese like we did for our dragon soup,
for the main course you can cut out vegetables with the cookie cutters, we did do this with pumpkin and squash and our bus cookie cutter.
Our crafting idea for greeting cards is especially suitable for older kids, teens and adults. If use a division of labor, bigger and smaller kids can help each other. Stitching holes along lines is usually makeable for kids in school age. The stitching with wool can be tricky at times, as one should not fold the paper.
If you are in the mood of more Christmas crafts and creating, what about making Christmas tree pendants and name tags out of salt dough.
Or pretty knitted covers for your tealight glasses to have enchanting shadows.
Pattern: DinA6 folding cards, long upright greeting card and place card (pdf)
If you would like to use all three templates, print them out three times and cut out only the template you would like to use.
If you would like to make envelopes for your elegant homemade Christmas cards, here you can find how to fold your own envelopes.
For the DinA6 Christmas card you need a square at least 24 x 24cm, or 9.5 x 9.5 inches for the matching envelope,
for the upright greeting card your square has to be at least 28 x 28cm = 11 x 11 inches.
Have fun making your homemade Christmas cards!
Still in need of fail prove homemade cookie dough. For the perfect Christmas cookies:
Christmas cookie dough recipe.
A must have treat at Christmas time: Baked Apple, the Austria Bratapfel.
07.12.2013. 17:50